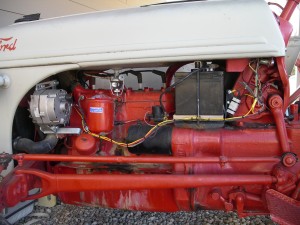
I finally got around to converting the 8N to a 12 volt system. You can’t believe the difference in starting. With the 6 volt system the engine cranked slow, and if the battery was at all low the ignition had weak spark. Now I give it half choke, push the start switch and it fires. I also rebuilt the carburetor and replaced the fuel valve/sediment bowl.
The carburetor leaked gas if I didn’t turn off the fuel after using the tractor, and the valve barely functioned. Just8Ns.com provided the carb rebuild kit, a new bracket for the alternator, and an alternator pulley. The rebuild process process is simple. Take the carb apart and replace all the old part with new. The kit comes with instructions. Be careful to not bend the Main Adjustment needle, the long one with the bigger knob, when putting the two halves together. Also use a gasket sealant on the halves, or the carb will leak.
Before starting the tractor, adjust both the Idle and Main needles to bottom, and then back out 1 1/2 turns. After starting and the engine is warm, return rpm to idle. Turn the Idle adjustment clockwise until the engine runs rough. Then turn it counter-clockwise until it runs smoothly. In fourth gear, drive the tractor at high rpm. Adjust the Main needle clockwise until the engine begins to loose power. Finally, adjust it counter-clockwise until it runs smoothly. Yeh, it requires a drive, stop, adjust, drive process, and assumes the engine timing is correct.
Back to the 12 volt conversion. Here’s what needs to be done:
- Acquire a 12 volt alternator. I choose a Delco 10-SI, which is a three wire alternator and costs $25 at the local salvage yard. It’s a good idea to check the bearings and brushes, and purchase a new two wire connector. If you take the alternator apart, use a bent paper clip to hold the brushes in place when putting it back together.
- The 8N uses a wider belt than the alternator pulley will accommodate, so you will need to replace it.
- The original generator bracket won’t hold the alternator. You will have to replace that too.
- You won’t have to replace the coil or starter. They were made to handle higher currents of a 6 volt system, and will be OK running at 12 volts.
- You will have to replace all 6 volt light bulbs with 12 volt bulbs.
- I chose to replace the amp meter with a volt meter. The former didn’t work, and the volt meter provides information I can better use.
- Remove the original voltage regulator. The alternator has an internal regulator. I left mine in place and cut off the wires.
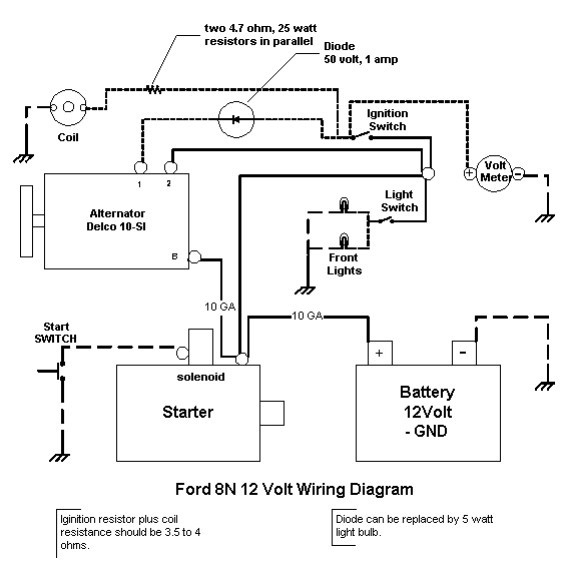
- Rewire as necessary and according to the wiring diagram here. Remember, the 6 volt system was a positive ground, and you are converting to a negative ground system. You may require new battery wires. Connect the battery + terminal to the starter along with the alternator Battery terminal.
- My tractor has a 12 volt terminal post, which I connected to the starter. All other 12 volt wires connect to this post, including the alternator Sense wire (2). The Field wire (1) activates the alternator when the ignition is on. It must be wired through a diode or light bulb — remember idiot lights.
- The resistance of the coil circuit needs to be 3.5 to 4 ohms to limit the current. If the coil doesn’t get enough current the engine will perform poorly at high rpm. If it gets too much, the points will burn. Measure the coil resistance, and add enough resistance to reach the necessary total. I added two 4.7 ohm resistors in parallel (= 2.35 ohms) to the 1.6 ohm coil resistance. Use 25 or greater watt resistors.
- Use 10 GA wire from the starter to the alternator and to the battery. Use 14 GA from the starter to the 12 volt terminal post. All other can be 16 GA.
Wait until you start you tractor the first time with a 12 volt battery. You did replace the 6 volt battery, right? It will all be worth it.


Leave a Reply